Trivial guide to Netboot using TFTP and DHCP
Today we are going to explore netboot through the installation of a basic boot server. It can be really useful to be able to boot quickly your favorite Linux live distribution or to perform maintenance operations, like partitioning or rescuing a defective system without having to prepare a USB flash drive.
What do I want?
The piece of art below precisely describes the configuration I want for my home setup:

The idea is to add my own DHCP server instead of using the one built-in my ISP gateway. Thus it would be possible to manage addresses allocation and in combination with the TFTP protocol to provide the devices with PXE netboot options.
A discrete piece of hardware is needed to hold both DHCP and TFTP services and provide storage for the netboot live images. While looking into my stuffs I found a good old Raspberry Pi B+ which is be the perfect low power server for that task.
In the next parts, I will assume that you are running a debian based distribution but apart from the packet management commands, the procedure should not differ a lot on other systems.
Setting up a TFTP server
TFTP for Trivial File Transfer Protocol is a basic file transferring protocol using UDP.
Compared to FTP its implementation is very simple it has very limited features, only providing what is necessary to transfer files between server and clients without any authentication or security. Therefore it should only be used on local networks to transfer files or configurations.
Installation
sudo apt install tftpd-hda

# Edit the configuration file
sudo vim /etc/default/tftpd-hpa

TFTP_USERNAME="tftp"
TFTP_DIRECTORY="/srv/tftp"
TFTP_ADDRESS="0.0.0.0:69" # TFTP default port is 69
TFTP_OPTIONS="-4 --create --secure"

# Attribute necessary rights to the TFTP_DIRECTORY
sudo chmod -R 777 /srv/tftp/
sudo systemctl restart  tftpd-hpa
The TFTP server should be working now.
Use the command netstat to ensure that the port 69 has been opened.
netstat -tulpen | grep 69
udp   0  0 0.0.0.0:69     0.0.0.0:*     0    15550    -
Let's do a simple test.
A trivial test : Sending a file
Collect your boot server's IP address with the ip a command.
On a different computer connected to your LAN network, install the tftp package.
sudo apt install tftpd-hda
Create a simple file and send it to your server through TFTP.
touch ~/my_file.txt

# Connect to the server
tftp
(to)SERVER_IP_ADDRESS
tftp>

# Send the textfile to our server TFTP_DIRECTORY with the put command
tftp> put ~/my_file.txt
tftp>

# Similarely we can download a file from our sever with the get command
tftp> get my_file.txt my_file_returns.txt
tftp> quit

ls *.txt
my_file.txt my_file_returns.txt
Ok, good!
We will not cover other TFTP commands here, please refer to the man.
Keep in mind that TFTP is not secure and should not be left running on a public server.
Now let's focus on something a bit less trivial.
Focusing on DHCP
The Dynamic Host Configuration protocol is the network protocol responsible for automatically assigning IP addresses to the connected devices.
The protocol is fairly complex and we will not go into details here. If you want to dive deeper, plenty of resources are available online including the protocol's RFC.
For our application we need a working DHCP server associated with TFTP to enable netbook on the LAN. The first thing to do is to disable the DHCP server provided by your ISP gateway. This is usually done through your gateway's web interface. We will not cover it since it is user specific.
We will be using the isc-dhcp-server implementation which is already compiled and packaged for most linux distributions.
# Install the package
sudo apt install isc-dhcp-server
The first thing to do is to specify the network interface that will be used by the DHCP server. Find your interface with the command ip a. In my case it is eth0.
sudo vim /etc/default/isc-dhcp-server

# Add these line and change the interface if necessary
INTERFACESv4="eth0"
INTERFACESv6="eth0"
Next step is the server configuration.
# DHCPCP configuration
sudo vim /etc/dhcp/dhcpd.conf

# Show that we want to be the only DHCP server in this network:
authoritative;

option subnet-mask 255.255.255.0;
default-lease-time 600;
max-lease-time 7200;
server-name "my_server_name";

# Here we create a simple subnet
# Clients will be assigned an IP between 192.168.0.11 and 192.168.0.100
# and access the internet through the defined router
# They will look for pxelinux.0 to netboot
subnet 192.168.0.0 netmask 255.255.255.0 {
  range 192.168.0.11 192.168.0.100;
  option routers 192.168.0.1; # our router
  filename "bios/pxelinux.0"; # PXE bootfile
}

# Define our tftp server
group {
  next-server 192.168.0.10; # our server
  host tftpclient {
    filename "biospxelinux.0";
  }
}
Then it is time to test our server:
sudo systemctl start isc-dhcp-server

# Connect a client and check the log
sudo journalctl -u isc-dhcp-server

$ journalctl -fu isc-dhcp-server
-- Logs begin at Thu 2019-02-14 20:06:42 UTC. --
Feb 19 22:31:05 raspberrypi dhcpd[382]: DHCPREQUEST for 192.168.0.53 from 8c:10:d4:f9:xx:xx via eth0
Feb 19 22:31:05 raspberrypi dhcpd[382]: DHCPACK on 192.168.0.53 to 8c:10:d4:f9:xx:xx via eth0

# Enable the service if working
sudo systemctl enable isc-dhcp-server
For further information check this article from debian's wiki or the man page. Not let us dive into PXE.
Preboot eXecution Environment (PXE)
We are almost ready to netboot, but we are still missing a crucial part: a bootloader.
Note that this part is dedicated to legacy BIOS systems, EFI part will come later.
Syslinux
We will use the SYSLINUX Project which is a suite of lightweight boot-loaders, for starting up computers with the Linux kernel. It provides everything we need to load our distributions.
# We need syslinux and pxelinux packages
sudo apt install syslinux pxelinux

# Create the bios boot directory in our TFTP_DIRECTORY
mkdir /srv/tftp/bios

# Copy the necessary boot files
cp /usr/lib/syslinux/modules/bios/* /srv/tftp/bios
cp /usr/lib/PXELINUX/pxelinux.0 /srv/tftp/bios

# Create a directory for our boot images
mkdir /srv/tftp/boot

# Link it to our bios boot folder
ln -s /srv/tftp/bios/boot /srv/tfptp/boot
Now we are ready to configure our boot menu.
Boot menu and distributions
Boot menus are text files that will be loaded by pxelinux.0
The basic syntax is really simple as shown below.
# Edit the default menu file
vim /etc/tftp/bios/pxelinux.cfg/default

DEFAULT menu.c32 # The basic UI conf file
PROMPT 0
TIMEOUT 300 # The timeout before auto boot (30 secs here)
ONTIMEOUT Local # The label to boot on timeout

MENU TITLE PXE Menu

LABEL Local # Local boot label
    MENU LABEL Boot local hard drive # Text label
    LOCALBOOT 0

MENU SEPARATOR # Menu separator

LABEL -
    MENU LABEL Distribution:
    MENU DISABLE # This menu entry will not be bootable

LABEL Archlinux
    MENU LABEL Boot Archlinux
    MENU INDENT 1 # Indent entry
    TEXT HELP # Subtext
    Archlinux 2019
    ENDTEXT

MENU SEPARATOR

LABEL -
    MENU LABEL Rescue:
    MENU DISABLE


LABEL Gparted_live
    MENU LABEL GParted Live
    MENU INDENT 1

LABEL Clonezilla
    MENU LABEL Clonezilla
    MENU INDENT 1
For further information, consult the syslinux wiki
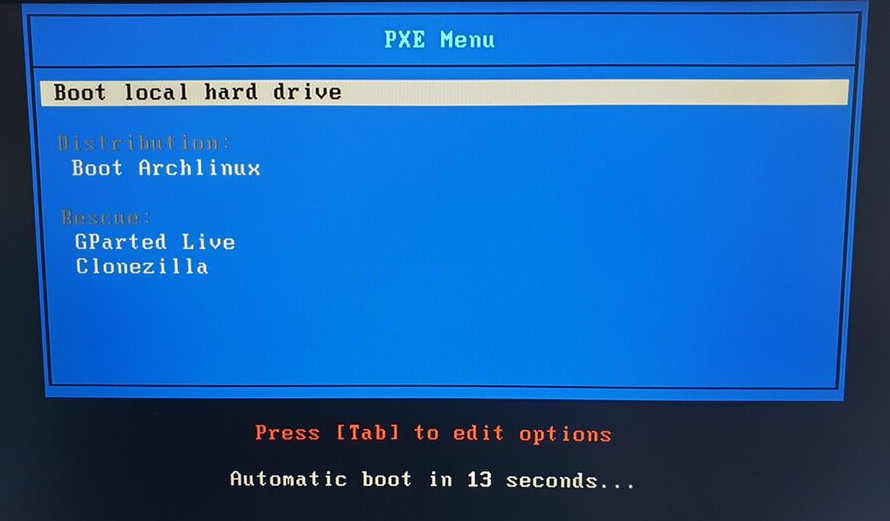
This menu will look like this:

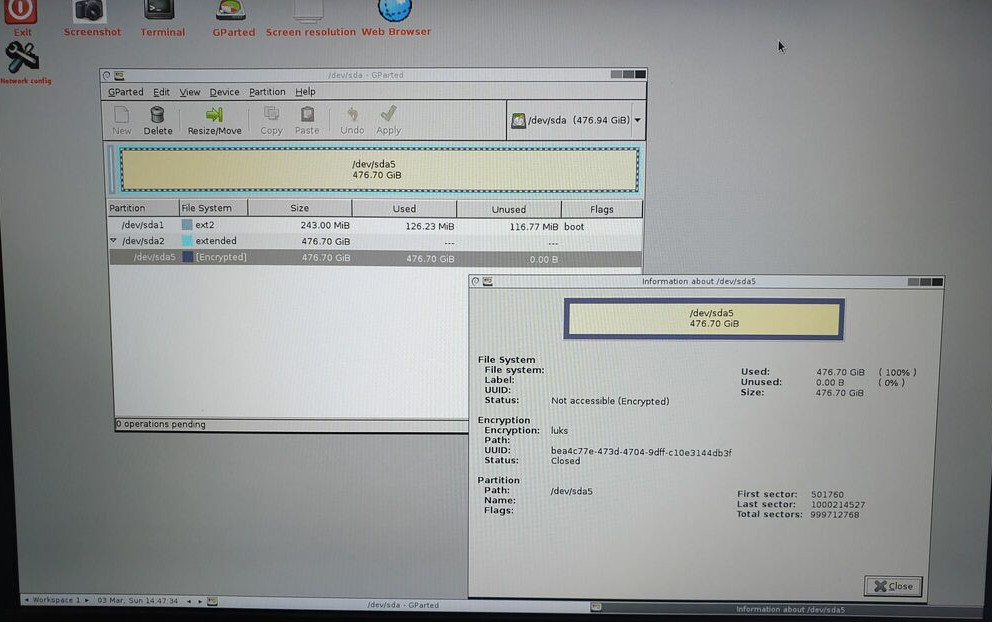
Gparted Live
The gparted live distribution is the ultimate partition tool. To be able to boot it we will need three files:
- An executable Linux kernel: vmlinuz
- An initial RAM disk loaded in the kernel boot procedure: initrd
- The file system to load: filesystem.squashfs
All of these can be found in Gparted live image available here as a zip archive. Note that we are using the x86-64 image here.
# Unzip the downloaded image
mkdir gparted
unzip gparted-live-0.28.0-1-amd64.zip -d gparted

# Create the gparted boot folder and copy the necessary files
mkdir /srv/tftp/boot/gparted
cp gparted/live/filesystem.squashfs /srv/tftp/boot/gparted
cp gparted/live/vmlinuz /srv/tftp/boot/gparted
cp gparted/live/initrd.img /srv/tftp/boot/gparted
We now have to adjust the entry in our menu configuration file by setting the boot files paths, the server's IP address and the live parameters.
vim /etc/tftp/bios/pxelinux.cfg/default

LABEL Gparted_live
    MENU LABEL GParted Live
    MENU INDENT 1
    KERNEL boot/gparted/vmlinuz
    APPEND initrd=boot/gparted/initrd.img boot=live config ip= noejct username=user union=overlay components noswap noprompt vga=788 keyboard-layouts=us locales=en_US.UTF-8 fetch=tftp://SERVER_IP_ADDRESS/boot/gparted/filesystem.squashfs
The fetch parameter provides the network path to the filesystem.
For more in-depth informations about live boot parameters, consult the debian wiki.
The configuration will be equivalent for most Linux live images.
Testing
Now it is time to test our system.
Connect a computer to your LAN and boot. Don't forget to enable Boot from Network in your BIOS. The boot menu should appear quickly after the Network Boot Agent sequence is completed.
Select the Gparted entry.

Et voilà!
You now have a working netboot!
What can be done next?
- Add more live images (distributions, architectures)
- Improve boot menu (split in multiple files)
- Use NFS protocol